Freeko_pir.pdf

HIGH-PERFORMANCE
WIRELESS PASSIVE
INFRARED DETECTOR
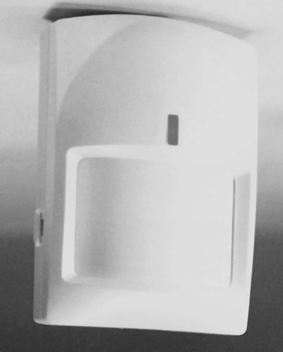
The Freeko PIR is a wireless high performance state-of-the-art Passive Infra-Red (PIR) detector designed to transmit a wireless signal upon the detection of an intruder moving within its coverage pattern.
Using the Freeko 2080 Wireless Adapter, the Freeko PIR can be connected to any existing intrusion alarm system allowing a fast, easy and reliable installation, without the need of cabling or preparing in-wall ducts. x Powered by a 3.6V Lithium battery x Ultra low current consumption x Battery life: up to 4 years x Built in an Automatic Power Saver (APS) x Sophisticated supervisor function x Automatic Low Battery signal x High stability RF circuitry with SAW x Lens selection x Sealed Optics eliminates false alarms x Automatic Temperature The detector transmits to its receiver unit four
(4) types of events (signals):
Alarm: Signal sent due to intrusion detection.
Low BAT: Signal sent whenever the battery
reaches a pre-set low level (2.5V).
Supervisor: A periodical signal sent by the
detector indicating its presence.
Tamper: Signal sent in case the FREEKO PIR
cover is removed.
APS. The unique APS (Automatic Power
Saver) function built-in the detector enables a
battery life span of five years. The detector will
transmit only if the last event has occurred
more than 2 minutes prior to the current one.
Choose a location covering the widest detection area. The dual element high quality sensor detects motion across the beam field; it is slightly less sensitive to motion toward the detector. As the detector is a wireless transmitter, and in order to take full advantage from the PIRs sophisticated operation, do not install the detector in areas where large metallic objects could interfere with the transmission.
It is also recommended to avoid the following locations:Facing direct sunlight. Facing areas that may change temperature rapidly.
Areas where there are air ducts or substantial airflow.
The Freeko PIR performs better when provided with a constant and stable environment. A variety of mounting positions is possible with the standard housing of the Freeko PIR. 1. Remove the front cover by loosening the screw (C) located at the bottom of the housing. 2. Loosen the screw (E) holding the PC board, slide down and carefully remove the PC board. 3. Mount the base on the wall (using screws) by punching out the two holes (A) located on the base. If a corner mounting is required, punch out the four (B) indentations, two on each side of the base. 4. Carefully place the PC board into its housing, rest the PC board on the resting points. Adjust slide according to installation height (Fig. 8, 9, or 10) and fasten screw (E). 5. After setting up the detector (page 6), put the front cover back and fasten with the screw located at the bottom of the housing (C). Setting the Sensitivity Slide switch
Position 2 = Normal
Position 4 = Harsh
The pulse slide switch sets up the sensitivity of
the detector for normal or harsh environments.
The “2” position setting is for normal operation
when using a long range or wide-angle lens.
The “4” position setting is for harsh
environment locations with air drafts or small
animals.
Setting Zone Selection Rotary Switch
Using a small screwdriver rotate the position of
the switch to identify the detector within one of
the 8 zones (marked 1 to 8).
Code Select DIP Switches
There are ten three-position DIP switches for
setting the code (- 0 +). In order to set up your
own “secret” code, set each of the 10 DIP
switches to one of the positions. Remember
that the dip switches in the detector and other
Freeko transmitters and receiver unit have to be
set to the exact same code, otherwise, the
system will not respond to the detector. In
order to ensure a proper and safe operation of
the system, once you install the detector please
select your own secret code (same code for the
detector & receiver unit).
IMPORTANT!
Never leave the detector set with factory codes.
Back Cover Holes
A. Knockout holes (2) for surface mounting
B. Knockout holes (4) for corner mounting
C. Hole for cover lock
D. Resting posts (6) for PCB
F I G . 1 : P I R H o u s i n g ( B a c k C o v e r ) Vertical Calibration
In case that Freeko PIR wireless detector has to
mounted at a height other than the
recommended (2.4m), the pattern of the area
under protection can be adjusted by sliding
vertically the printed circuit board up or down
inside the back cover.
The normal position (factory set) is at 0, which appears on the scale printed on the upper left side edge of the circuit board. By moving the circuit board up, the detection area is focused closer to the unit. Moving the circuit board down increases the distance at which the unit will work most effectively.
CALIBRATION
MOUNTING
SELECTOR
TRANSMITTER
F I G . 2 : F r e e k o W i r e l e s s P I R Test Push Button
A miniature push button is located on the left side of the detector (covered by small cap). This button is used to activate the walk and the transmission range test feature of the Freeko PIR detector. Walk test.
A short press (less than one second) enables the
alarm LED (IR detection only without
transmission) for a period of one minute;
enable walk tests and vertical calibration
adjustments possible.
Transmission range test
A longer press, (more than 1.5 seconds)
enables the transmission range test feature
which activates 10 (ten) transmission signals at
6 second intervals (total test time 1 (one
minute). Each transmission is indicated by
short flash of the red LED.
To check the function it is necessary to verify
on the Freeko-2080 Wireless Adapter that the
Alarm LED was on and that the 7-segment
display shows the zone from which the alarm
was received. For verification please press the
History push button and the display will
indicate how many alarm signals have been
received and from which zone. . (Please
remember that if the cover of the detector is not
assembled, the Tamper LED indicator will
also light on the Receiver Unit)
Few interchangeable lenses are available:
Extra wide-angle lens: 15.3 m (50 ft)*.
Long-range lens: 30.5 m (100 ft)*.
Vertical curtain lens: 22.5 m (73 ft)*.
Animal (Pet) alley: 7 m (23 ft)*.
The lens should be selected according to the
nature of the Protected site and specific area
requirements.
*Detection range specified at 25qC (77qF).
Changing A Lens (Fig. 3)
Hold the front housing cover and carefully
push outwards the inner side while pulling the
lens holding frame in the opposite direction.
The lens holding frame will gently pop out.
Push in the lens from outside the front cover.
Insert a new lens with the grooved surface to
the inside.
Make sure the lens is facing the right way up.
Snap the lens holding frame back into place.
PULL LENS FRAME OUT
PULL OUTWARD
FRONT COVER
FRONT COVER
LOCKING SCREW
A 3.6V lithium battery powers the PIR. Due to its exclusive APS (Automatic Power Saver) characteristics, the battery provides up to four years of continuous operation (depending on the amount of transmissions). If the battery reaches a factory preset low level, a Low Battery signal is transmitted and from this moment the detector remains operational for several days giving enough time to replace the 3.6V lithium battery. Battery Replacement
Remove the front cover locking screw.
Carefully remove the front cover. Remove the
old battery and replace it with a fresh new one.
Notice polarity.
Note:
The battery must be replaced only with A1/2
(HALF) AA size 3,6V lithium battery.
F i g . 4 : E x t r a W i d e A n g l e L e n s ( L 0 1 ) F I G . 7 : P e t A l l e y L e n s ( L 0 4 )
Operating Temperature: -10 to +50oC(+14 to +122 oF)Storage Temperature: -20 to +55oC(-4 to +131 oF) Power Source: 3.6 VDC 1.2 AH ½ AA Lithium Optional Lens: Vertical Barrier (curtain), Animal Alley, Extra Wide Angle Tamper: Protected of cover RemovalSupervisor: Factory set.
Number of zones: 8 zonesNumber of codes: 59,049 (310) diff. codesFrequency: 303.825, 418, 433.92 MHzOutput Transmission Power: 0 dbM (1 mW) Dimensions:97mm (3.8”) x 64mm (2.5”) x55mm (2.2”)Weight (including battery): 120 gr (4.16 oz)Environmental: Indoor Installation WARNING: Test this product at least once

Source: http://www.av-gad.hu/letolt/manualen/AV-GAD%20FREEKO%20PIR.pdf

med.uni-goettingen.de

T a g d e r M e d i z i n 2 0 0 7 Befreiung von der abhängigkeit arzneimittel helfen beim ausstieg Immer bessere Medikamente helfen Abhängigen, auch dauerhaft von ihrem Suchtstoff loszukommen. Diese Chancen sollen konsequenter genutzt werden. Abb. 1: Mit Naltrexon (Nemexin®) plus Acamprosat (Campral®) Abb. 2: Vareniclin (Champix®) hilft am besten bei der Nikotin- Abb. 3: H

Impaginato

Personaggi Il Conte; La Contessa; Susanna; Figaro; Che-John Brownlee; Elisabeth Rethberg; Licia Al-rubino; Marcellina; Bartolo; Don Basilio;banese; Ezio Pinza; Jarmila Novotna; Irra Pe-Don Curzio; Barbarina; Antonio; Due Conta-tina; Salvatore Baccaloni; Alessio De Paolis;George Rasely; Marita Farell; Louis D’Ange-lo; Helen Olheim, Maxine Stellman. Coro eOrchestra del Metropolitan Opera

© 2010-2014 Pdf Medical Search